Wednesday 13 November 2013

How To Disable/Enable Oracle Apps (EBS 11i ) Users Using API


How To Disable Oracle Apps (EBS 11i ) Users  Using API
Oracle API we can Disable Oracle Apps user Using the below API,
SQL > conn apps/apps_Password;
SQL>execfnd_user_pkg.updateuser(x_user_name=>'USER_NAME',x_owner=>'CUST',x_end_date=>SYSDATE-1);
SQL>commit;
How To Enable Oracle Apps (EBS 11i ) Users  Using API
SQL > conn apps/apps_Password;
SQL>      begin
   fnd_user_pkg.enableuser('USER_NAME', sysdate, sysdate+30);
end;
SQL>commit;
Note : where user USER_NAME is which user name you  needed to Disable or Enable.

Friday 16 August 2013

Notification Mails are not sending to approver in Oracle Apps 11i


Notification Mails are not sending  to approver in Oracle Apps 11i

Step 1: check whether the user has selected his preference to receive his Notification Mail HTML using the below query.
SQL > sqlplus  ‘apps/apps_pwd’
SQL > SELECT * FROM FND_USER_PREFERENCES WHERE USER_NAME='USER_NAME_OF_THE _USER' AND MODULE_NAME=’WF’;
In this above query it must show preference_value=MAILHTML  , If not you need to Login to Oracle Apps after Login to Oracle Apps on top right corner click on preferenceà scroll Down à In Notifications à select mail style as HTML mail à click apply.
Step 2: Login as sysadmin and go to user management search that user name and verify his email address is associated with his Oracle ID , If not go to HRMS responsibility once again add his email ID to his ID and save.
Step 3: Login as sysadmin and request to run “synchronize wf local tables “   to synchronize all table updates
Step 4 : send some test PO’s for Approval whether he is receiving Notification mail or not  
Also check through query ,
SQL > Select * from wf_notifications  ORDER BY BEGIN_DATE DESC;
In this output MAIL_STATUS=’SENT’ means Notification mail’s are sending to that user.

Wednesday 26 June 2013

SETTING UP CRON JOBS IN UNIX AND SOLARIS

SETTING UP CRON JOBS IN UNIX AND SOLARIS

Cron is a unix, solaris utility that allows tasks to be automatically run in the background at regular intervals by the cron daemon. These tasks are often termed as cron jobs in unix , solaris.  Crontab (CRON TABle) is a file which contains the schedule of cron entries to be run and at specified times.
This document covers following aspects of Unix cron jobs
1. Crontab Restrictions
2. Crontab Commands
3. Crontab file – syntax
4. Crontab Example
5. Crontab Environment
6. Disable Email
7. Generate log file for crontab activity
1. Crontab Restrictions
You can execute crontab if your name appears in the file /usr/lib/cron/cron.allow. If that file does not exist, you can use
crontab if your name does not appear in the file /usr/lib/cron/cron.deny.
If only cron.deny exists and is empty, all users can use crontab. If neither file exists, only the root user can use crontab. The allow/deny files consist of one user name per line.
2. Crontab Commands
export EDITOR=vi ;to specify a editor to open crontab file.
crontab -e    Edit your crontab file, or create one if it doesn’t already exist.
crontab -l      Display your crontab file.
crontab -r      Remove your crontab file.
crontab -v      Display the last time you edited your crontab file. (This option is only available on a few systems.)
3. Crontab file
Crontab syntax :
A crontab file has five fields for specifying day , date and time followed by the command to be run at that interval.
*     *     *   *    *        command to be executed
-     -     -   -    -
|     |     |   |    |
|     |     |   |    +----- day of week (0 - 6) (Sunday=0)
|     |     |   +------- month (1 - 12)
|     |     +--------- day of        month (1 - 31)
|     +----------- hour (0 - 23)
+------------- min (0 - 59)
* in the value field above means all legal values as in braces for that column.
The value column can have a * or a list of elements separated by commas. An element is either a number in the ranges shown above or two numbers in the range separated by a hyphen (meaning an inclusive range). Notes
A. ) Repeat pattern like /2 for every 2 minutes or /10 for every 10 minutes is not supported by all operating systems. If you try to use it and crontab complains it is probably not supported.
B.) The specification of days can be made in two fields: month day and weekday. If both are specified in an entry, they are cumulative meaning both of the entries will get executed .
4. Crontab Example
A line in crontab file like below removes the tmp files from /home/someuser/tmp each day at 6:30 PM.
30     18     *     *     *         rm /home/someuser/tmp/*
Changing the parameter values as below will cause this command to run at different time schedule below :

min
hour
day/month
month
day/week
Execution time
30
0
1
1,6,12
*
– 00:30 Hrs  on 1st of Jan, June & Dec.

0
20
*
10
1-5
–8.00 PM every weekday (Mon-Fri) only in Oct.

0
0
1,10,15
*
*
– midnight on 1st ,10th & 15th of month

5,10
0
10
*
1
– At 12.05,12.10 every Monday & on 10th of every month
:
 
Note : If you inadvertently enter the crontab command with no argument(s), do not attempt to get out with Control-d. This removes all entries in your crontab file. Instead, exit with Control-c.
5. Crontab Environment
cron invokes the command from the user’s HOME directory with the shell, (/usr/bin/sh).
cron supplies a default environment for every shell, defining:
HOME=user’s-home-directory
LOGNAME=user’s-login-id
PATH=/usr/bin:/usr/sbin:.
SHELL=/usr/bin/sh
Users who desire to have their .profile executed must explicitly do so in the crontab entry or in a script called by the entry.
6. Disable Email
By default cron jobs sends a email to the user account executing the cronjob. If this is not needed put the following command At the end of the cron job line .
>/dev/null 2>&1
7. Generate log file
To collect the cron execution execution log in a file :

30 18 * * * rm /home/someuser/tmp/* > /home/someuser/cronlogs/clean_tmp_dir.log

Audit Trails in oracle database


            Audit Trails in oracle database

Auditing Trails Records are stored in two ways

1) Database Table (sys.aud$)

2) OS Directory (audit_file_dest)

Option 1 : If we use DB table to store auditing records Performance will be degrade, Because these tables are under SYSTEM Tablespace by default, also we can move this sys.aud$ table to dedicated tablespace for this we need to create new Tablespace. Oracle recommends to use OS Directory to store Audit Trail Records.

Table Growth: The Audit Trails table growth depends on what are the Auditing are enabled, for example: If whenever a table has been altered, updated, inserted or deleted.

SQL> AUDIT ALTER, GRANT, INSERT, UPDATE, DELETE

    ON DEFAULT;

 Purging Audit Trails Table: The purging Audit Trails Records in the tables can be manually purge or automatic purge.

Option 2: If we use OS Directory to store auditing records there will not be any performance issue also easy to manage those log files, we can define its size and age. Purging also enabled as automatic purging.

Our Plan:

As per Oracle recommendation we will implement OS Directory to store these Audit Trail Records.

Procedure:

1) Modify the initialization file for enabling Audit trail.

2) Set the Audit file destination in initialization file.

3) Define the Size of its log file.

4) Define days to create new log file.

5) Define Purging days for automatic purging.

6) Define Audit Trails in Database.

7) Bounce the Database.

8) Create new pfile from spfile.

Step 1: Modify the initialization file for enabling Audit trail.

SQL> ALTER SYSTEM SET audit_trail=os SCOPE=SPFILE;

System altered.

SQL> ALTER SYSTEM SET AUDIT_SYS_OPERATIONS=TRUE SCOPE=SPFILE;

System altered.

Step 2: Set the Audit file destination in initialization file.

#Default Location is $ORACLE_HOME/rdbms/audit

If we like to change to location for log files the below command will change its location.

SQL> ALTER SYSTEM SET audit_file_dest=/backup/Audit_Trails/ SCOPE=SPFILE;

System altered.

Note : some latest it will work otherwise need to edit on pfile , bounce Database using new audit_file_dest=’<new location >’.

Step 3: Define the Size of its log file.

If we like to create new file after reaching 100MB, the following procedure calls new log file after reaching 100MB.

BEGIN

DBMS_AUDIT_MGMT.SET_AUDIT_TRAIL_PROPERTY(

       audit_trail_type => DBMS_AUDIT_MGMT.AUDIT_TRAIL_OS,

       audit_trail_property  =>  DBMS_AUDIT_MGMT.OS_FILE_MAX_SIZE,

       audit_trail_property_value =>  102400 /* 100MB*/ );

END;

/

Step 4: Define days to create new log file.

If we like to create new file after one day, the following procedure calls new file after 1 day.

BEGIN

DBMS_AUDIT_MGMT.SET_AUDIT_TRAIL_PROPERTY(

       audit_trail_type => DBMS_AUDIT_MGMT.AUDIT_TRAIL_OS,

       audit_trail_property  =>  DBMS_AUDIT_MGMT.OS_FILE_MAX_AGE,

       audit_trail_property_value  =>  1 /* days */);

END;

/

Step 5: Define Purging days for automatic purging.

If we like to purge all Auditing Records after 7 days, the following procedure will purge after 7days once.

BEGIN

  DBMS_AUDIT_MGMT.CREATE_PURGE_JOB (

   AUDIT_TRAIL_TYPE            => DBMS_AUDIT_MGMT.AUDIT_TRAIL_OS,

   AUDIT_TRAIL_PURGE_INTERVAL  => 168,

   AUDIT_TRAIL_PURGE_NAME      => 'Standard_Audit_Trail_PJ',

   USE_LAST_ARCH_TIMESTAMP     => FALSE );

END;

/

Step 6: Define Audit Trails in Database.

To protect unauthorized access of all Table, we will Audit any Create, Alter, Update and Delete on all tables using the following query,

SQL> AUDIT DELETE ANY TABLE, ALTER ANY TABLE, CREATE ANY TABLE, UPDATE ANY TABLE BY SYS,APPS;

Step 7: Bounce the Database.

SQL>SHUTDOWN IMMEDIATE

SQL>STARTUP

Step 8: create new pfile from spfile

SQL > CREATE PFILE FROM SPFILE;

Monday 13 May 2013

SOME USEFUL UNIX COMMANDS


1) To create a empty file
 
          oracle@db$touch file_name   or  oracle@db$ >file_name

in the above cmd oracle@db--> my host name , touch--> cmd to create a file and file_name-->required to file name to create.

2) To display a file contents 

          oracle@db$cat file_name  

note : cat command displays all the content of file if the file is more than the window size you can use more command

         oracle@db$more file_name 

       this more command displays as your window size within time . To see whole content press space bar


3) To search a sting with in a file 


          syntax : oracle@db$ grep sekar file_name

         oracle@db$ grep -i ora-  /oracle/proddb/bdump/alert_PROD.log 

             output :


ORA-19504: failed to create file ""
ORA-00312: online log 2 thread 1: '/data02/proddata/log02a.dbf'
ORA-00312: online log 2 thread 1: '/data02/proddata/log02b.dbf'

grep -->global regular expression print 

i --> for case sensitive

ora-  --> required to search in my file

alert_PROD.log --> input file in this i want to search 


4) To count how many lines in a file 

                 syntax :

                oracle@db$wc file_name 
   
                example : 

oracle@db$ wc alert_DEV.log
  258072  1877537 13329816 alert_DEV.log

258072-->total lines

13329816 -->total words in the file 

if u want only how many line , you can use $wc -l file_name

5)To edit a file using vi editor 

Before a open a file in vi editor , you need to check your current editor 
$echo EDITOR output of the command shows vi means it's ok , if it not returning anything means you need set editor as vi 

check current editor $ echo $EDITOR
To set ediotr            $ export EDITOR=vi

To open a file $ vi alert_ORCL.log
To open a file as read only $ vi -R  alert_ORCL.log or $ view alert_ORCL.log

after opening a file to insert ---> esc + i

to move between line ---> esc + upper arrow or esc + lower arrow 
to search a sting vi mode ---> esc + /string 
to erase a letter ---> esc + x
to erase a whole line ---> esc + dd
to save and quit ---> esc + :wq
to quit without save ---> esc + :q!
to move upper ---> esc + k
to move lower ---> esc + j
to move right side ---> esc + l
to move left side ---> esc + h

6)To list files within a directory 

syntax : oracle@db$ ls 

options :

ls -la ----> to list hidden file including 
ls -ltr  or ls -lrt  ---> for ascending order 
ls -lt ---> for descending  order


7) To make compressed zip file 

Note : In the below all gzip and tar cmd instead of file you can directory also.

To comprees 
syntax : oracle@db$ gzip file_name

To decompress 
syntax : oracle@db$ gzip -d file_name.gz

8) To make tar ( like win-rar in windows ) 


tar - Tape ARchiver

And the options:

c - create 

x - extract
v - verbose output (lists all files as they are extracted)
j - deal with bzipped file

To make tar of some files 

oracle@db$ tar cvf file_name.tar file_name1 file_name2 file_name3

The above command will create file_nam1 , file_name2 and file_name3 into a size file as file_name.tar.
after making tar also the source files will exist like file_nam1 , file_name2 and file_name3.

To make untar 

oracle@db$ tar xvf file_name.tar 

The above cmd will untar the file_name.tar into file_name1 , file_name2 and file_name3 .


9)To make compressed tar 

oracle@db$tar cjvf file_name.tar.bz2 file_name1 file_name2 file_name3

To make decompress 

oracle@db$tar xjvf  file_name.tar.bz2 

10)To check particular process is running or not 

oracle@db$ ps -ef | grep http

To check all the process of particular user process 

oracle@db$ ps -fu oracle 


Pls give some comments........:)

Saturday 13 April 2013

FRM-92095 : ORACLE JInitiator Version too low


       FRM-92095: Oracle JInitiator version too low


If you facing problem when opening ORACLE APPLICATION FORMS browser says FRM-92095: Oracle JInitiator version too low.

Step 1 : download the file from

TO DOWNLOAD JINITIATOR CLICK HERE

Step 2: Install the jinit13122.exe on your Desktop

Step 3: Navigate to : Start->Settings->Control panel ->Java(icon)->Double click and open the Java icon->it will open->java control panel->in that menu open java->after clicking on java menu->u will get view button ->click on view->it will open some row of parameters ->in that double click on Runtime parameters->after clicking on that ->paste this parameter (   -Djava.vendor="Sun Microsystems Inc."    ) without bracket ->after that ->ok->apply->ok

Step 4 : after completing step 4

Step 5 : Test now Forms are opening

Note : before doing the above steps u must have  to install  the Java.

Friday 12 April 2013

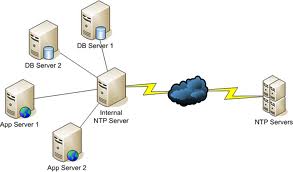
NTP Service Sync on UNIX

NTP SYNC ON LINUX


STEP 1 : STOP THE NTP SERVICE

PROD@oracledb#service ntp stop

STEP 2 : SYNC WITH NTP SERVER

PROD@oralcedb#ntpdate 197.0.0.55

STEP 3: START NTP SERVICE

PROD@oracledb#service ntp start

STEP 4 : CHECK THE STATUS OF NTP SERVICE WHETHER STARTED OR NOT

PROD@oracledb#service ntp status

NTP SYNC ON SOLARIS 5.8

STEP 1 : STOP NTP SERVICE

DEV@DB#./etc/init.d/xntpd stop

STEP 2 : SYNC WITH NTP SERVER 

DEV@DB#ntpdate 197.0.0.55

STEP 3 : START NTP SERVICE 

DEV@DB#./etc/init.d/xntpd start

STEP 4 : CHECK THE STATUS OF NTP SERVICE 

DEV@DB#ps -ef | grep ntp

NTP SYNC ON SOLARIS 5.10

STEP 1 : STOP NTP SERVICE 

TEST@APPS#svcadm disable ntp 

STEP 2 : SYNC WITH NTP SERVER

TEST@APPS#nptdate 197.0.0.55

STEP 3 : START NTP SERVICE 

TEST@APPS#svcadmenable ntp

STEP 4 : CHECK THE STATUS OF NTP SERVICE 

TEST@APPS#svcs -a | grep ntp